Git for Small Websites (Backup + History Without Pain)
If you’ve ever edited a small website and thought, “I should probably back this up… somehow,” you’re already 90% of the way to understanding why Git is worth it.
This isn’t a pitch for GitFlow, a 47-step branching strategy, or turning your brochure site into an “enterprise software project.” This is Git as a safety net: backup, history ... and (when you need it) collaboration.
And if you’re using WebHaste, Git fits especially well because you’re already working with real files: plain HTML, CSS, JS, and assets you own.
What Git gives you on a small site
For small websites, Git is basically three things:
- Backup: Your site isn’t “that folder on your laptop.” It’s a repo you can copy, clone, and store in multiple places.
- History: You can go back to “the version from last Tuesday” without playing detective or digging through “final-final-2.html”.
- Collaboration: When more than one person touches the site, Git gives you a sane way to merge changes and see what happened.
Even if you never use a branch in your life, just having a clean commit history is a huge upgrade over “hope nothing breaks.”
Why we love VS Code's built in git management for WebHaste sites
We use VS Code alongside WebHaste for git management. It has built in graphical tools that make git easy ... no typing command line stuff needed.
VS Code is freely available from Microsoft for Windows, Mac and Linux devices at this address: https://code.visualstudio.com/download
Starting a new website project, our typical workflow looks like this:
- Go to GitHub and create a new private repository
- Copy the link provided
-
Open VS Code, open the Git panel in the left nav, click the "..." More Actions button and select "Clone" (you may need to connect your GitHub account if you haven't already done this)
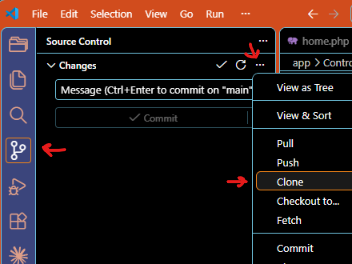
- Paste in the link provided by GitHub
- Tell VS Code which parent folder to use to to store the project files on your computer (like C:\projects)
- Open the new project folder in VS Code
- Open WebHaste in your browser and click "Open Project Folder;" select the project folder you just created (like C:\projects\my-project)
- Return to VS Code and see the site files and folder structure that WebHaste just scaffolded
-
Click on VS Code's Git button again and you should see all the files that have been added/modified listed under "Changes."
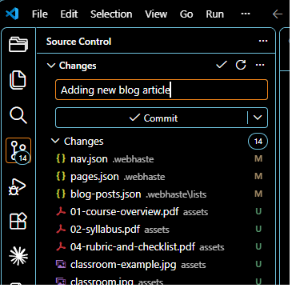
- Enter a descriptive message (i.e. "Initial site files scaffolded by WebHaste") and click Commit.
- Press "Sync Changes" to upload the changes to GitHub
That's it. Rinse and repeat, and you've got a great Git workflow and backup system.
The simplest repo setup (that stays simple)
A small website repo can be boring. Boring is good.
A typical site structure might look like this:
  ├── index.html
  ├── about.html
  ├── contact.html
  ├── assets/ (files used by pages)
    ├── orgchart.pdf
    └── photo1.jpg
  ├── elements/ (files used by the template)
    ├── logo.png
    └── favicon.png
  ├── scripts/ (stylesheets and JS files)
    ├── scripts.js
    └── styles.css
If your site is built/managed with WebHaste, that “real files in folders” approach is the whole point. Git just adds a timeline.
A basic .gitignore (ideas, not commandments)
You generally want to commit the stuff that is your site (HTML/CSS/JS/assets) and ignore the stuff that’s generated, temporary, or machine-specific. When you scaffold a new WebHaste site, we provide a basic gitignore file that exludes the internal file we used to track whether files have been published yet:
# WebHaste — local-only files that shouldn't travel with the project.
# Safe to edit/extend; WebHaste only ever creates this once and never
# overwrites it after that (same as CLAUDE.md, robots.txt, etc).
.webhaste/publish-state.json
Some other files or directories you might want to exclude based on your situation:
# OS noise
.DS_Store
Thumbs.db

# Editor config files
.vscode/
.idea/
.sftp/

# Logs
*.log

# Output folders, unless you're using Git Pages for CI
dist/
www/
A commit routine you’ll actually follow
The best Git workflow is the one you’ll do when you’re tired, busy, and just trying to ship a change.
Here’s a routine that works for most small sites:
- Make a small change (update copy, add a page, swap an image).
- Preview it (especially if you touched navigation or links).
- Commit it with a human message (“Update hours for winter schedule” beats “stuff”).
If you only remember one rule, make it this: commit when you’d be annoyed to redo the work.
Useful commands (minimal set)
# first time in a folder
git init

# see what changed
git status

# stage and commit
git add .
git commit -m "Update homepage hero copy"

# view history
git log --oneline
If you want Git to feel less like a command-line ritual, use a GUI (GitHub Desktop, Sourcetree, VS Code’s Git panel). Same benefits, fewer spells.
Simple branching (when you need it)
You don’t need branches for every change. But branches are great for “I want to try something without risking the main site.”
# create a branch and switch to it
git checkout -b new-homepage-cta

# commit work on the branch as usual
git add .
git commit -m "Test new CTA button"

# switch back to main
git checkout main
If you’re using a hosted Git platform (like GitHub), branches + pull requests are the cleanest way to review changes before they land.
Three workflows that cover 95% of real life
1) Solo: “I just want backups and undo”
- Work directly on
main. - Commit often (small commits).
- Push to a remote if you want off-device backup.
This is the “Git as Time Machine” workflow. It’s underrated.
2) Agency: “We need review and a paper trail”
- Create a branch per change (especially anything client-facing).
- Open a pull request for review.
- Merge when approved.
This keeps “who changed what” from becoming a Slack archaeology project.
3) Client handoff: “They should own it, and we should sleep at night”
- Keep the repo clean and documented.
- Tag a release (or at least commit) for the handoff moment.
- Make sure the client can clone/download the repo and rebuild/deploy without you.
Git makes handoff less fragile. The client gets the full site history, not just a zip file labeled “final.”
Where WebHaste fits in
WebHaste is file-first: you edit real HTML pages and assets, and the tool helps you manage and publish them without needing a server, database, or complicated setup.
That means Git can sit underneath your WebHaste workflow as the “safety layer”:
- Use WebHaste for editing and managing site content.
- Use Git for history, backup, and collaboration.
- Use your host/deploy setup (Cloudflare Pages, Netlify, or anything else) for publishing.
Importantly: using Git doesn’t turn WebHaste into “Git homework.” It just gives your site a rewind button and a paper trail.
CTA: Try WebHaste
If you want a small-site workflow that stays small (but still feels professional), download WebHaste and build on files you control:
 Recent Articles